Product Information | Special Effects & Embellishments

Special Effects and Embellishments are a form of decoration or ornamentation applied to a printed product. Special effects are a great way to add flare and wow factor to grab attention and leave a lasting impression.
From flat effects such as Spot UV to Raised effects such as our Scodix or Metal finishes, you are bound to find something that will make your printing stand out from the crowd.
Are you looking for online pricing?
We offer cheap printing prices, premium quality Special Effects and simple online ordering.
Types of Special Effects & Embellishments
Spot UV
Spot UV is a clear and flat glossy coating that’s added to specific elements of your design. Once the effect is applied, it’s exposed to ultraviolet light, which hardens and dries the coating.
For best results, we always apply Spot UV over a Matt or Velvet laminated surface. The effect works especially well on dark, rich backgrounds where the gloss effect can really stand out. Spot UV is great for creating contrast and drawing attention to key parts of your design and because it’s a flat (2D) finish, it can extend right to the edge of your design. It can also be used to create subtle and creative background patterns that catch the light.
Scodix (Raised Spot Gloss)
Scodix is another type of gloss finish, similar to Spot UV in that it’s applied to specific areas of your design. However, unlike Spot UV, Scodix creates a raised, 3D effect with a high-gloss finish—making it a striking way to emphasise key elements.
For the most impactful contrast, Scodix works best when applied over a matt or velvet laminate background. Due to its raised texture, Scodix is not best suited for very fine lines, small details or serif fonts as it can cause them to ‘fill in’. For ideal reproduction, we recommend using thicker, sans-serif fonts or bold design elements. Outside of some specific cases, Scodix cannot extend to the edge of a design (no external bleed) and cannot be applied over folds or score lines due to its raised profile and risk of cracking.
Raised Metal
Raised Metal is a premium spot effect that uses a similar process to Scodix, but with an added layer of metallic foil on top. Once applied, the raised (3D) gloss is coated in your choice of Silver, Gold, Rose Gold, or Holographic foil—creating a luxurious, high-impact finish. This effect is most effective when applied over a matt or velvet laminate, enhancing both texture and contrast.
To achieve the most striking results, we recommend using Raised Metal sparingly and only on selected elements within your design. Like Scodix, the raised finish may cause very fine lines, delicate serif fonts and small elements to ‘fill in’ or break-up.
Due to its raised nature, Raised Metal cannot bleed to the edge of the design, nor can it be applied over folds or score lines.
Spot UV Artwork Setup Instructions
If you are ordering a product with Spot UV, please follow the artwork instructions below. Please click here to download a PDF copy of these instructions.
Spot UV Requirements:
There can be a small amount of variance/shift when applying the Spot UV effect. Because of this we advise against applying the effect to very thin lines, small text, finely detailed artwork and borders or narrow strips around the outside of your design.
- Text must be no less than 8pt
- The line weight must be no less than 0.6pt
- Text should be in a sans serif font (e.g Helvetica) as opposed to a serif font (e.g. Times New Roman) to avoid elements ‘filling in’ or breaking up.
Special effects and embellishments can only be created & setup in Adobe InDesign or Adobe Illustrator. If you don’t have access to either of these programs please refer to the options below:
I Have Finished Artwork in Editable (Vector) Format
You have finished artwork which contains the embellishments or special effects as a vector (editable) objects, please select the Check and Make Press Ready service when placing your order. We will then amend your artwork and special effects & embellishments to be press ready for you.
I Have Finished Artwork in Non-Editable (Rasterized) Format
If you have finished artwork, but it contains embellishments or special effects as rasterized (or un-editable) objects, or if your artwork is not setup for embellishments or special effects at all, please contact us and ask for a custom quote on creating the special effects & embellishments for you.
I Do Not Have Finished Artwork
If you don’t have finished artwork please select the Affordable Design service when placing your order and we will create your artwork for you (this includes us setting up the artwork for the special effects & embellishments for you).
Instructions for setting up Spot UV Artwork:
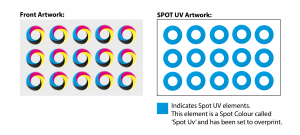
- Create a new layer for the Spot UV effect. Select the elements you wish to enhance with the effect and duplicate them to the new layer.
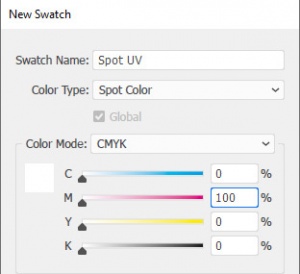
- Create a NEW colour swatch and name it ‘Spot UV’. Select colour type ‘Spot Colour’ and colour mode as CMYK. Ensure that the colour breakdown of the swatch is 100% of either C, M, Y or K. We recommend C:0%, M:100%, Y:0%, K:0%. Apply the new colour swatch to all elements on your new layer which you wish to have Spot UV applied to. No other elements should be on your Spot UV artwork layer.
- IMPORTANT – Select all graphics on the new Spot UV layer and set them to “Overprint Fill/Stroke” in the Attributes palette:
- Adobe InDesign: Window > Output > Attributes
- Adobe Illustrator: Window > Attributes
- It is important to make sure that the Spot UV layer is identical in all respects (size, orientation, crop, position of images and text etc.) to your original artwork.
- How to Supply your Files
Your Spot UV layer must be supplied as a separate file from your front and back artwork. E.g. for a double sided business card you would supply 3 files:- The FRONT of the Business Card
- The BACK of the Business Card
- The Spot UV Artwork Layer
- IMPORTANT – Select all graphics on the new Spot UV layer and set them to “Overprint Fill/Stroke” in the Attributes palette:
Please note: If the effect is only applied to one side of your design, it will always be applied to the front page of your artwork.
Please click here to navigate to our Guideline Templates page to download our PDF instructions on how to setup the Spot UV artwork.
Scodix Setup Instructions
If you are ordering a product with Scodix, please follow the artwork instructions below. Please click here to download a PDF copy of these instructions.
Artwork requirements:
There can be a small amount of variance/shift when applying the Scodix effect. Because of this we advise against applying the effect to very thin lines, small text, finely detailed artwork and borders or narrow strips around the outside of your design.
- Text must be no less than 8pt
- The line weight must be no less than 0.6pt
- Text should be in a sans serif font (e.g Helvetica) as opposed to a serif font (e.g. Times New Roman)
- Scodix elements cannot bleed off the edge of your design or overlap a score or fold line
- All Scodix elements must be placed at least 5mm inside the trim edge and 5mm away from all score and fold lines
- We don’t recommend applying Scodix to thin or fine elements or fonts to avoid elements ‘filling in’ or breaking up
Special effects and embellishments can only be created & setup in Adobe InDesign or Adobe Illustrator. If you don’t have access to either of these programs please refer to the options below:
I Have Finished Artwork in Editable (Vector) Format
You have finished artwork which contains the embellishments or special effects as a vector (editable) objects, please select the Check and Make Press Ready service when placing your order. We will then amend your artwork and special effects & embellishments to be press ready for you.
I Have Finished Artwork in Non-Editable (Rasterized) Format
If you have finished artwork, but it contains embellishments or special effects as rasterized (or un-editable) objects, or if your artwork is not setup for embellishments or special effects at all, please contact us and ask for a custom quote on creating the special effects & embellishments for you.
I Do Not Have Finished Artwork
If you don’t have finished artwork please select the Affordable Design service when placing your order and we will create your artwork for you (this includes us setting up the artwork for the special effects & embellishments for you).
Instructions for setting up Scodix Artwork:
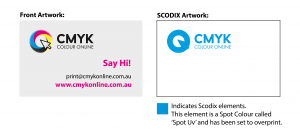
- Create a new layer for the Scodix (raised gloss) effect. Select the elements you wish to enhance with the effect and duplicate them to the new layer.
- Create a NEW colour swatch and name it ‘Scodix’. Select colour type ‘Spot Colour’ and colour mode as CMYK. Ensure that the colour breakdown of the swatch is 100% of either C, M, Y or K. We recommend C:0%, M:100%, Y:0%, K0%. Apply the new colour swatch to all elements on your new layer which you wish to have Scodix applied to. No other elements should be on on your Scodix artwork layer

- IMPORTANT – Select all graphics on the new layer and set them to “Overprint Fill/Stroke” in the Attributes palette:
- Adobe InDesign: Window > Output > Attributes
- Adobe Illustrator: Window > Attributes
- It is important to make sure that the Scodix layer is identical in all respects (size, orientation, crop, position of images and text etc.) to your original artwork.
- How to Supply your Files
Your Scodix layer must be supplied as a separate file from your front and back artwork. E.g. for a double sided business card you would supply 3 files:- The FRONT of the Business Card
- The BACK of the Business Card
- The SCODIX Artwork Layer
- IMPORTANT – Select all graphics on the new layer and set them to “Overprint Fill/Stroke” in the Attributes palette:
Please note: The front page of your artwork will be the page that the Scodix is applied to.
Please click here to navigate to our Guideline Templates page to download our PDF instructions on how to setup the Scodix artwork.
Raised Metal Setup Instructions
If you are ordering a product with Raised Metal, please follow the artwork instructions below. Please click here to download a PDF copy of these instructions.
Artwork requirements:
There can be a small amount of variance/shift when applying the Raised Metal effect. Because of this we advise against applying the effect to very thin lines, small text, finely detailed artwork and borders or narrow strips around the outside of your design.
- Text must be no less than 8pt
- The line weight must be no less than 0.6pt
- Text should be in a sans serif font (e.g Helvetica) as opposed to a serif font (e.g. Times New Roman)
- Raised Metal elements cannot bleed off the edge of your design or overlap a score or fold line
- All Raised Metal elements must be placed at least 5mm inside the trim edge and 5mm away from all score and fold lines
- We don’t recommend applying Raised Metal to thin or fine elements or fonts to avoid elements ‘filling in’ or breaking up
Special effects and embellishments can only be created & setup in Adobe InDesign or Adobe Illustrator. If you don’t have access to either of these programs please refer to the options below:
I Have Finished Artwork in Editable (Vector) Format
You have finished artwork which contains the embellishments or special effects as a vector (editable) objects, please select the Check and Make Press Ready service when placing your order. We will then amend your artwork and special effects & embellishments to be press ready for you.
I Have Finished Artwork in Non-Editable (Rasterized) Format
If you have finished artwork, but it contains embellishments or special effects as rasterized (or un-editable) objects, or if your artwork is not setup for embellishments or special effects at all, please contact us and ask for a custom quote on creating the special effects & embellishments for you.
I Do Not Have Finished Artwork
If you don’t have finished artwork please select the Affordable Design service when placing your order and we will create your artwork for you (this includes us setting up the artwork for the special effects & embellishments for you).
Instructions for setting up Raised Metal Artwork:
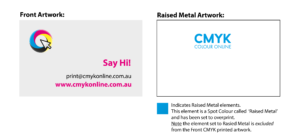
- Create a new layer for the Raised Metal effect. Select the elements you wish to enhance with the effect and duplicate them to the new layer. As the Raised Metal finish is solid and printed on top, the same CMYK element should not be in the CMYK artwork layer as it may be visible due to possible shifting. To avoid this, please ensure you remove duplicated CMYK elements from your artwork layer and only have then visible on the Spot layer.
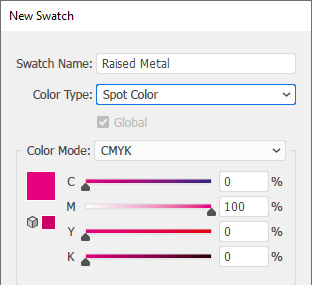
- Create a NEW colour swatch and name it ‘Raised Metal’. Select colour type ‘Spot Colour’ and colour mode as CMYK. Ensure that the colour breakdown of the swatch is 100% of either C, M, Y or K. We recommend C:0%, M:100%, Y:0%, K0%. Apply the new colour swatch to all elements on your new layer which you wish to have Raised Metal applied to. No other elements should be on on your Raised Metal artwork layer.
- IMPORTANT – Select all graphics on the new layer and set them to “Overprint Fill/Stroke” in the Attributes palette:
- Adobe InDesign: Window > Output > Attributes
- Adobe Illustrator: Window > Attributes
- It is important to make sure that the Raised Metal layer is identical in all respects (size, orientation, crop, position of images and text etc.) to your original artwork. Please check you have followed Step 1 at this stage.
- How to Supply your Files
Your Raised Metal layer must be supplied as a separate file from your front and back artwork. E.g. for a double sided business card you would supply 3 files:- The FRONT of the Business Card
- The BACK of the Business Card
- The Raised Metal Artwork Layer.
- IMPORTANT – Select all graphics on the new layer and set them to “Overprint Fill/Stroke” in the Attributes palette:
Please note: The front page of your artwork will be the page that the Raised Metal is applied to.
Please click here to navigate to our Guideline Templates page to download our PDF instructions on how to setup the Raised Metal artwork.
If you still have questions, or cannot find what you are looking for in the resources provided above, please contact us by clicking here and one of our team will get back to you promptly.